Showing posts with label Nellies Multi Frame's. Show all posts

Monday, May 7, 2012

Baby Boy

Front
Back 
Here's a gift tag I made for a Baby Shower
I used the 509 Rock A Bye Baby and 974 Gift for Baby curved stamps from SweetStamps.com.  I stamped the image on 36# Vellum using White Dye ink and heat embossed using Queen's Gold EP.  From the back side I colored in the image using Memento markers (Cottage Ivy, Bahama Blue, Rich Cocoa, Angel Pink, Cantaloupe and Summer Sky).  I hand cut the image and layered it to a circle of white card stock die cut from the XMC4 Classic Circle Window Little Stackers from Cheery Lynn Designs.  The blue doily was die cut from the Nellis MFD020 Flower Multi Frame die, I cut 2, layered them together with adhesive and ran the ribbon through a hole at the bottom and then feed the ribbon from each side through a hole at the top, tying a loop in the ribbon.  For the back I die cut the circle from Cryogen White card stock, stamped the sentiment using Tidal Wave Shades Dye ink and added Nightingale Square Candi adhered using Candi Fix foam dots finish it off.

Monday, February 6, 2012

Horse Portrait Oval 2011


Supplies
Horse Portrait Oval and Howdy stamps from SweetStamps.com
Shades Dye inks-French Roast and Gibraltar from SweetStamps.com
Rodeo XL Embossing Plate from Cheery Lynn Designs
DD011 Double Corner Die, Multi Frame Oval-3 (MFD 013) and MFD 007 Oval die from Nellie's
Copic Markers-W1, W3, W5, B93 and C0
Tuxedo Black Memento ink from Tsukineko
5 3/4" x 5 3/4" square cream folded card from The Paper Cut
4 1/2" x 3 1/2" Solar White paper
3 1/2" x 5 3/4" Plaid paper from Kaiser Craft
3 x 5 3/4", 1 1/2" x 2 1/2" and 2" x 2" White distressed paper from Kaiser Craft
3/4" x 5 3/4", 3/4" x 3 1/2" and 2" x 2" Black patterned paper from Kaiser Craft
2 1/2" x 1 1/2" and 5" x 4 1/2" Vacation Blue (dark) cardstock from Core'dinations
6 1/2" piece of 1/8" aqua ribbon
Distrezz-it-All from Zutter Innovative Products
Big Shot machine from Sizzix
Dot Runner from Scotch
Sanding block
Foam dots
Metal buttons-3
Micro and Mini glue dots
Scissors
Sponge
Scotch Tape

1. Ink the XL embossing plate with Gibraltar ink and emboss the 3 x 5 3/4 distressed white paper.  Layer this to the front of the card using dot runner. Using dot runner, layer plaid paper to front of card slightly overlapping white embossed paper.

2. Use black ink to stamp Horse oval on Solar White paper, color with Copic markers.  Cut out oval with scissors.

3. Die cut a large oval using the MFD 013 Oval 3 large oval die from the 5 x 4 1/2 Blue cardstock.  Use the Distress-it-All to distress the edges of the oval.  Sponge the edges with French Roast and Gibraltar inks.  Layer horse oval to this using dot runner.

4. Die cut a small oval using the MFD 013 oval-3 from the 2 1/2 x 1 1/2 Blue cardstock.  Die cut the small oval ribbon die using the MFD 007 from the 1 1/2 x 2 1/2 distressed white paper.  Using Gibraltar ink, stamp Howdy on white oval.

5. Ink the ribbon, using the W5 Copic marker to darken the color.  Thread the ribbon thru the opening of the stamped white oval.  Attach the ribbon to the 5 3/4 x 3/4 black paper by taping the tails of the ribbon in the back with scotch tape.  Layer to the card using dot runner.  Center the white oval over the plaid side of card, use dot roller to attach the blue oval to the back of the white oval.  Adhere oval to card with a foam dot.

6.  Die cut the corner pieces from the black and white 2" squares, using the white paper for the top and the black paper for the bottom border.  Use micro glue dots to layer the white cut out to the black bottom piece and layer to card using dot runner.

7.  Layer the 3/4 x 3 1/2 black paper to center of card using dot runner.  Layer the Horse oval to the card using form dots.  Adhere buttons to the black strip of card using mini glue dots.  

Monday, February 14, 2011

More Valentines


Emboss a 3"x 5 1/2" piece of red and aqua cardstock using SweetStamps.com new embossing plate.  Rub white dye ink directly to the red paper to highlight the embossing.  Layer both pieces to a 5 3/4"x 5 3/4" dark brown square and layer this to a square card.  Die cut the hearts for both the front and inside of card in red, aqua and dark brown cardstock.  Emboss the hearts using the Dots embossing folder and SweetStamps embossing plate.  Stamp Country Hearts and Heart Patches on red cardstock using embossing ink and detail white embossing powder.  Cut the hearts out.  Attach striped ribbon to the front of the card and layer hearts to card as shown using foam dots to attach the Country hearts.  Arrange three hearts inside the card and stamp Be Mine in center heart using embossing ink and emboss with detail white EP.

Products used:

SweetStamps.com Stamps-Be Mine #993, Country Hearts Patch Large 110, Heart Patches # 108, White Detail EP, White Dye ink
Nellie's Multi Frame's Heart #MFD022
Crafts Too Embossing folder Dots #3014
Distress Embossing ink
American Crafts-striped ribbon
foam dots


Emboss red, aqua and dark brown cardstock using SweetStamps.com new embossing plate.  Rub
white ink directly to the paper to highlight the embossing.  Tear paper into pieces and randomly glue to the front of a white note card.  Attach ribbon to center of card.  Die cut hearts from red, aqua and dark brown paper and emboss using Dots embossing folder and SweetStamps.com embossing plate.  Rub white ink on aqua heart to highlight embossing.  Layers hearts together and layer o card using foam dots.  Using micro glue dots attach the metal heart to front of card.  For the inside of the card use the cut outs from the die cuts as a stencil and ink hearts using Valentine, Montego Bay and French Roast ink applying with a sponge.  Stamp Be My Valentine in center heart using French Roast ink.

Products used:

SweetStamps.com Stamps-Be My Valentine, Shades Dye inks- Valentine, Montego Bay and French Roast, White Dye ink
Nellies Multi Frame's-Heart #MFD022
American Crafts-ribbon
Gary Burlin-Krystal Klear Hardware heart
Micro glue dots and foam dots


Start with a 5 3/4" x 5 3/4" square card.  Cut a piece of gold mirror cardstock the same size as the card and attach to the front.  Using the Nellie's die, cut the corner pieces from gold mirror cardstock and Stardreams textweight paper, layer the pieces together and adhere to the bottom corners of the card.  Emboss the hearts for the front of the card using the Trendy Ornament Hearts stencil from the gold mirror cardstock and Stardreams textweight paper.  Cut out and layer to the card using foam dots between the large heart and the card and between the hearts.  Apply the pearl stud to the center of the heart.  For the inside, die cut the hearts from the Nellie's heart die, layer together and stamp Be My Valentine in center using embossing ink and Medieval Metals EB.  Layer to inside of card.

Products used:

SweetStamps.com-Stamp-Be My Valentine, Medieval Metals EP, Distress embossing Ink
Nellies Multi Frame's Heart #MFD022 Nellie's D Die #DD011
Ecstasy Crafts-Trendy Ornament Hearts
Prima Marketing-Say it with Studs #530983
The Paper Cut-Gold Mirror cardstock, Stardreams textweight paper, square card
Foam dots


This card was done the same as the Gold card above but all papers were Stardreams textweight.
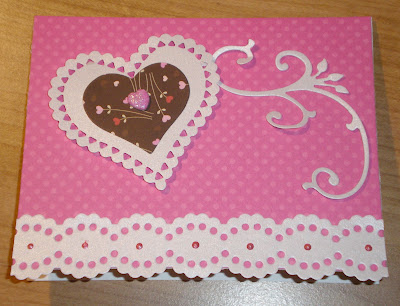

Start with a piece of 4 1/4" x 5 1/2" dotted paper.  Layer to the front of an A2 white card.  Die cut the hearts from Ice Silver Stardream textweight paper and Bo Bunny Love Hearts paper, using the Nellie's Heart die.  Layer hearts together and add a glitter heart to center.  Die cut the swirl using the Stardreams paper the Marianne's die.  Use foam dots to attach the heart layer to the front of the card and micro glue dots to attach the swirl.  From a 2" x 5 1/2" piece of the Stardreams paper die cut the border using the Nellie's border die.  Cut one side first, then line up the die for the second cut by placing the die close to the first cut to form scallops on each side of the border.  Attach border to bottom of card, letting it hang slightly over the edge of the card.  Apply Liquid Pearls to the center of the scallops.  For the inside, use the cut out from the Stardreams paper heart as a stencil and using a sponge apply Fuschia Fizz ink to the heart.  Stamp SweetStamps.com Happy Valentine's Day in  center of heart in Fuschia Fizz ink.

Products used:

SweetStamps.com-Stamp Happy Valentine's Day #952, Fuschia Fizz Shades Dye ink
Nellies Multi Frame's Hearts #MFD022 and Borders #MFD023
Marianne's Design #LR0112
The Paper Cut-A2 card, Iced Silver textweight Stardreams paper
Bo Bunny-Love Hearts and dotted paper
Liquid Pearls-Flamingo
foam dots and micro glue dots


Using removable tape line up the Trendy Ornament Heart stencil on a 4 3/4"x 4 3/4" piece of white cardstock.  Use chalk to color in the flowers and vines and a fine black multiliner for the dots.  Carefully chalk heart in center.  Layer the stenciled card to a 5 1/4" X 5 1/4" piece of red cardstock using clear photo corners.  Attach ribbon to the bottom corners of the card, taping the tails in the back.  Layer the red card to the front of a square white card of the same size.  Stamp Happy Valentine's Day in Fuschia Fizz ink in the center of the heart.

Products used:

SweetStamps.com Happy Valentine's Day #952   Fuschia Fizz Shades Dye ink
Ecstasy Crafts-Trendy Ornament Hearts #4253023
The Paper Cut-square card
Copic Multiliner 0.3
Chalk, ribbon

Thursday, February 10, 2011

Hot Pink Valentine


This card was made for Sweet Stamps - Shades of Pink Challenge
Please visit the Sweet Stamps Blog and enter the challenge for chance to win a $20 shopping spree in the store!! 


Layer a 6 1/4"x 4 1/2" piece of dotted cardstock to a A6 white card, round the top corners with a corner rounder. Die cut hearts from Spring Astro Silver and pink cardstock, layer hearts together and use foam dots to layer to card.  Die cut the scallop border from a 5"x2" piece of textweight paper using border die.  Line up the second cut so that it will form scallops on both of the long edges of the paper.  Layer this to the bottom edge of card so that the scallop hangs slightly over the edge of the card.  Die cut a small heart from pink paper and layer it to a piece of textweight paper, trim around the heart leaving a slight border.  Emboss Be Mine to heart using embossing ink and white embossing powder, heat set. Punch a hole near top of the small pink heart and attach an eyelet to it.  Weave the ribbon through one of the openings in the large heart and thread both ends through the eyelet tying a knot in the back.

Products used:
SweetStamps.com Be Mine stamp #993, white Embossing powder, Distress Embossing ink
Nellies Multi Frame's Hearts #MFD022, Borders #MFD023
The Paper Cut-Spring Astro Silver cardstock, Iced Silver textweight Stardreams paper, A6 white card
1/4" white satin ribbon, foam dots, pink eyelet, corner rounder, dotted and solid pink paper

Valentine Heart with Ribbon


Ink the Love Hearts embossing folder with Sunrise Orchid ink directly to the folder before embossing a 3 3/4" x 5" piece of white cardstock.  Die cut the solid heart from the medium orchid shade of paper and the doily heart from the Spring Astro Silver.  Layer a 5 1/2" x 4 1/4" piece of Iced Silver textweight Stardreams paper to an A2 white card and round the corners.  Round the corners of the embossed hearts layer, attach a piece of 1 1/2" sheer ribbon to the front by taping the tails to the back and layer to the card.  Make a bow from 1 1/2" ribbon and use a glue dot to attach to the ribbon on the card.  Use foam dots to layer the white heart to the pink heart and foam dots to layer the pink heart to the card.

Products used:
SweetStamps.com Shades Dye Ink-Sunrise Orchid
Crafts Too-Love Hearts embossing folder # 3021
Nellies Multi Frame Heart # MFD022
Coordinations Core Color cardstock-Orchid/medium
The Paper Cut-Spring Astro Silver cardstock & Iced Silver textweight paper
white cardstock and A2 white card
large corner rounder
1 1/2" sheer wired ribbon
foam dots and glue dots